Glass Neon Text With Ornament Photoshop Tutorial
16
In this exclusive Photoshop tutorial, you will learn how to create glass neon text effect with adding ornament motives in Photoshop.
1. Start with typing some text. For example, “Graphic Mania” with World of Water font. The color is #00add8. Rotate the type box.

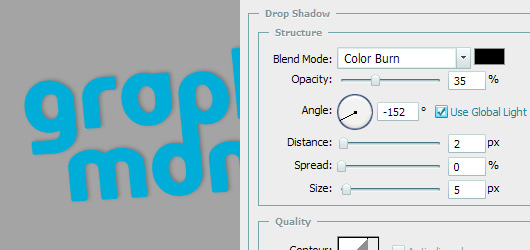
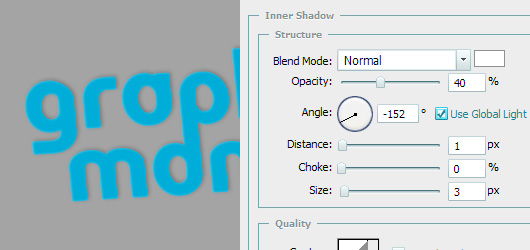
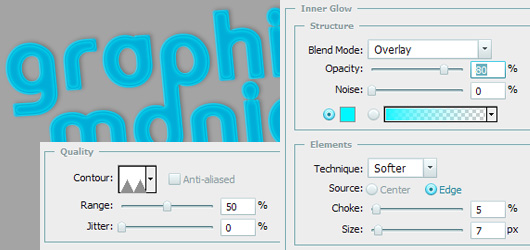
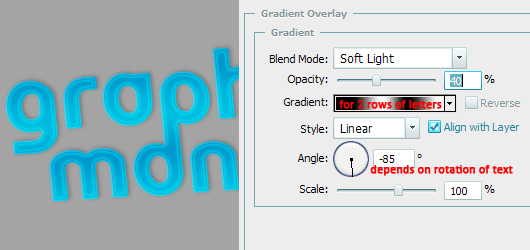
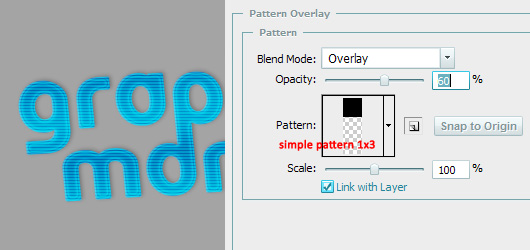
2. Add some effects to this layer: Drop Shadow, Inner Shadow, Inner Glow, Pattern Overlay and Gradient Overlay. The settings and results from each effect are shown below. This will change the outlook of our text pretty much,
And you get this:

3. To add “volume” to the text, duplicate type layer, CLEAR this layer’s style, change its color to a little lighter one, rasterize it, place it UNDER the original type, and move it a bit down and to the left. Continue this (duplicating each new copy -> moving down and left) until it looks nice enough. Then merge these layers except the original type.

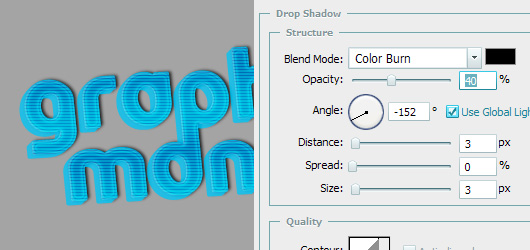
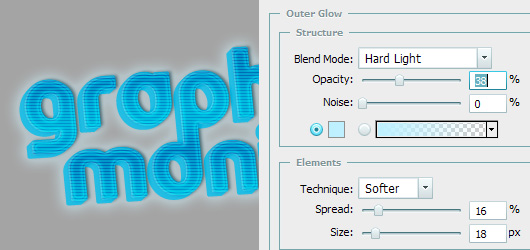
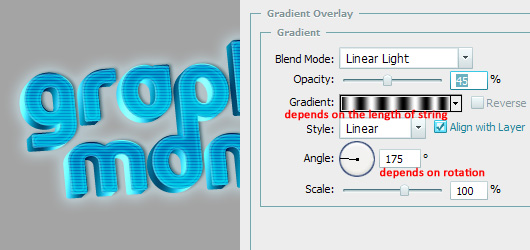
Add layer style to the “volume” layer: Drop Shadow, Outer Glow, Gradient Overlay.
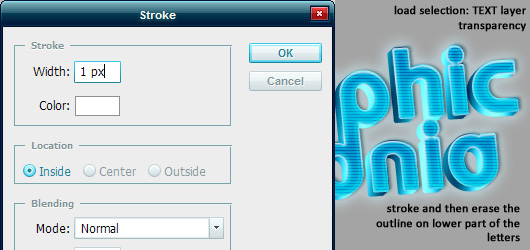
4. Add blank layer, then select the original type layer, load selection of its transparency, go back to blank layer and stroke this selection as its shown. Then erase the white outline on the lower parts of the letters.
5. Add some extra shades. Duplicate the original text layer, clear its style, make the color black and rasterize it. Then apply some blur (Gaussian Blur, Motion Blur) and drag this layer UNDER all other. Change the blendin mode to Color Burn, decrease the opacity (to 40%).

6. As for floral ornament, the actions are almost the same as with main text. Paint with Brush tool of blue color on a new layer. You can add the same style as to the text, plus some options (added Stroke, added Outer Glow). The settings are alike to those of main type layer, but you can change them for better outlook. I have 3 layers with this floral ornament: 1- ornament with layer effects, 2- without layer effects, blending mode is Hard Light, 3- black and blurred layer placed under the text. So, after this step the image should look this way.

7. The final point – adding “glass” effect. To do it, first add a blank layer. Select Pen tool and create a work path like shown on the picture.

Make it a selection and fill it with gradient (on the blank layer).

Then load selection of type layer transparency, invert the selection and clear the areas of layer with gradient that are in this selection (=are not on the type). Repeat the same action with the other string on a new layer. Erase what you don’t need with Eraser tool. Ta-dam! Ready! Place it on a cool background and enjoy.


[…] This post was mentioned on Twitter by Web Design News, Uzma Saeed. Uzma Saeed said: Glass Neon Text With Ornament Photoshop Tutorial http://bit.ly/9h1Ch […]
Social comments and analytics for this post…
This post was mentioned on Friendfeed by Rafiq Elmansy: Glass Neon Text With Ornament Photoshop Tutorial
http://www.graphicmania.net/glass-n……
[…] more: Glass Neon Text With Ornament Photoshop Tutorial | Flash, Design … SHARETHIS.addEntry({ title: "Glass Neon Text With Ornament Photoshop Tutorial | Flash, Design […]
[…] the rest here: Glass Neon Text With Ornament Photoshop Tutorial | Flash, Design … […]
[…] the rest here: Glass Neon Text With Ornament Photoshop Tutorial | Flash, Design … Share and […]
[…] Read the original post: Glass Neon Text With Ornament Photoshop Tutorial | Flash, Design … […]
[…] Glass Neon Text With Ornament Photoshop Tutorial Glass Neon Text With Ornament Photoshop Tutorial […]
looks really nice, i like this effect. thanks..
.-= joyoge bookmark´s last blog ..60+ Creative Ideas about Kitchen Decorations | Dzinepress =-.
nice one, thanks for sharing
Very cool! Now how do I make a background like the one in this tut?
We will add more tutorials soon, keep tuned!
how can i get the pattren ?? !!
how can i get this pattern please help
oh! now i get i just googled it and i found it and by the way nice tutorial 😀
You can do it in Photoshop. This tutorial may be useful:
http://www.graphicmania.net/quick-tip-how-to-create-a-seamless-pattern-in-photoshop/
@mahmmod, i readjust the on of basic patterns. i using this tutorial for “audio engineering school” facebook page. i having trouble with 4th step.. i did as described and i do not see any stroke and “erase white outline” i do not see non of it. Nice job by the way.