How to Create HDR Photos in Photoshop CS5
25
The new Photoshop CS5 comes with new revolutionary features that will change how Photoshop users work. These changes make their projects become easier, faster and it helps them to integrate with other Adobe products in the Adobe Creative Suite 5.
Before continuing reading this post, did you already join our Twitter and subscribe to our RSS feed? If not, rush and join us now to receive updates of new posts and free resources.
The new Photoshop CS5 includes new features such as Mixer brushes, Content-aware, 3D Repoussé, 3D materials, enhanced raw plug-in and the improved MergeHDR Pro feature. In this article, we will cover the MergeHDR Pro feature in Photoshop CS5 and how to use it to create HDR photo effects with simple steps. Before we go into the tutorial steps, let us briefly tackle some information about the HDR photo concept.
What is HDR imaging?
High Dynamic Range (HDR) imaging is a technology that allows images to include a wide range of colors compared with normal images. This wide range of colors support high ranges of light and color contrast; making the images look like the real environment while giving the scene a more dramatic feel. This is done by using the highest range of luminance in the images’ light and shadow areas.
HDR imaging is produced by merging multiple photographs of the same object or scene photographed with different exposure values.
Below are some tips on how to take your own photos in sequence in order to create HDR photography:
- Add the camera to a tripod to make it stable.
- Take around five to seven photos with different exposure values, the minimum number of images that Photoshop can accept is three images.
- Use different shutter speeds to create different exposures. Changing the aperture changes the depth of field and can produce low-quality photos; while changing the ISO may cause noise in the image.
- The variation between exposure values should be one or two steps between each image.
- Make sure that the light is the same as well as the objects in the images because Photoshop only calculate the changes in the exposure.
In this tutorial, we will convert multiple images into one HDR image using the improved Merge to HDR Pro in Photoshop CS5.
Working with the Merge to HDR Pro
The Merge to HDR Pro is one of the enhanced features in Photoshop CS5 and it allows you to import multiple photos into the Merge to HDR Pro dialog box so, you can apply different effects on the produced image. You can apply this example to the HDR sample provided in Photoshop CS5’s directory: Program Files>Adobe>Adobe Photoshop CS5>Samples>Merge to HDR.
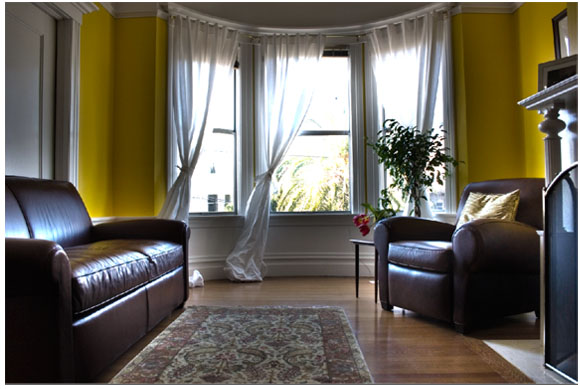
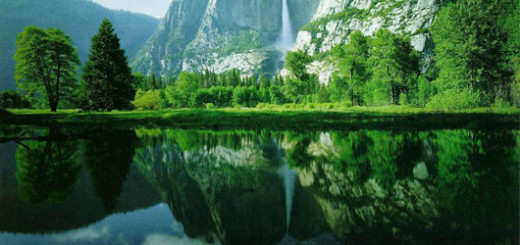
In this example, we will load into Merge to HDR Pro three images that have been taken with different exposures and settings as below:
1. Open Photoshop CS5 and choose File > Automate > Merge to HDR Pro
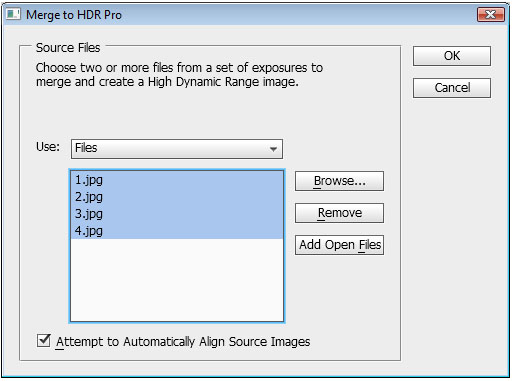
2. In the Merge to HDR Pro dialog box, you can either load the images by selecting the images separately or select the whole folder through the Use drop-down list
3. Click Browser and go to the HDR default example in the Photoshop CS5 folder :\Program Files\Adobe\Adobe Photoshop CS5\Samples\Merge to HDR
4. The images are loaded to the list, select all the images by click the image while holding the Ctrl key (Command in Mac). And click ok to load the selected files
The Merge to HDR Pro dialog box appears to let you edit the HDR settings. The dialog box includes three main parts. The preview part, the images sequence part and the settings part. In the preview part, you can see the results of the different settings and zoom the preview in and out by using the preview drop-down list on the bottom left of the preview part. The image sequence part shows the images that are used to create the HDR image and its aperture.
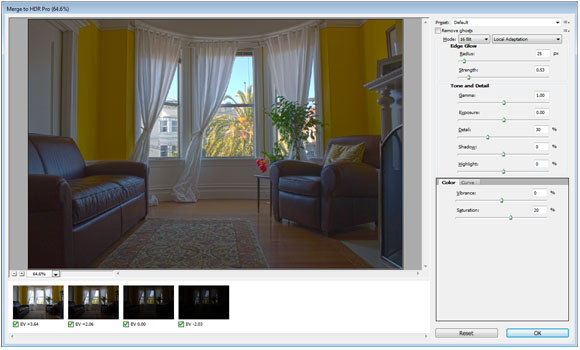
Also, you can check those images to include or exclude from the sequence. The settings part includes the different options to set the HDR image parameters to create different effects as below:
Preset
This drop-down list includes a ready-to-use HDR effects that you can apply by choosing it and then previewing each effect in the preview image. You can also save your custom preset from the icon next to the Preset list as HDT format, or you can load external presets as well.
Remove ghosts
When you apply multiple images, some images may have little changes in their positions. The Remove ghosts’ check box removes these unwanted ghosts keeping the image clear.
32 bit images
From the Mode list, you can choose the images mode from the supported 8, 16 and 32 bit images. Each mode has its own options and setting; generally, the 32 bit mode has a limited option to only modify the image histogram. When you select any of the 8 or 16 bit modes, you get the following options:
Local Adaptation
This option changes the tone of the HDR by changing the bright areas in the image.
Edge Glow
This value lets you set the bright areas regain settings. The radius value sets the size of the bright areas and the strength sets the distance required to differentiate the bright and the non-bright areas.
Tone and Details
These values let you set colors and tone details through a set of options such as Gamma, Exposure, Details, Shadow and Highlight.
Color
You can set the intensity of the subtle colors through the Vibrancy; and you can set the color saturation through the Saturation value.
Tone Curve
T
The tone curve lets you set the lamination of the image through the histogram curve where you can add points and drag it to adjust the image lamination. You can add as many points as you want; every point presents a change in the curve values that affect the image.
Now, let us go back to our example and set the HDR values as follows:
5. Select the mode to be 16 Bit and choose Local Adaption
6. In the Edge Glow, set the Radius value to 360 and the Strength to 4
7. In the Tone and Details, set the Gamma value to 3, Exposure to -50, Detail to 88, Shadow to -100 and Highlight to 82
8. In the Curve graph add two points and set their location as seen in the figure below
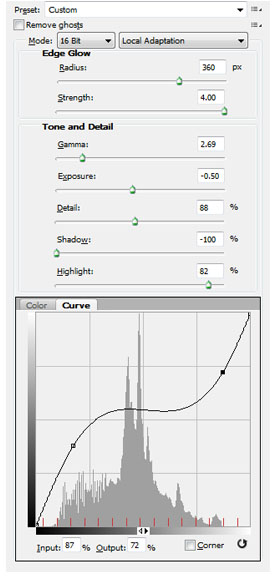
9. Click Ok to open the result as an image
You can change the above values based on your desires and how you would like the HDR photo image to end up looking like.
Conclusion
The HDR images include a wide range of settings and each setting produces a different effect. The example above shows only one of these effects and you can always practice more effects and tones. The best practice for the HDR imaging process is to start by taking some images based on the guidelines mentioned above and use it to create your own HDR images.


Very Good Tutorials, I also added your Tutorial on facebook
Thank you so much 🙂
Thanks for sharing this wonderful post
http://www.photoshopclippingpath.us/clipping_path_services.html
Awesome Thanks, I had trouble getting the settings right, but this is a great start point, I can tweak them a bit from your settings and the results are amazing 😀
cool. thanks!
Mmmmmmm now I know. Cool stuff
thks dude………………
thks dude………….
Nice tut
I recently bought CS5 Extended. I finally decided to get more serious about photo editing. I had Elements 6 until now. You merged 3 .jpg I would like to use raw files. Is there any advantage to that or should I convert to .jpg and then merge. I can do all the adjustment to each photo in camera raw and then merge.
thanks
stew
Merging HDR images requires to use JPG. The RAW extension will be opened in Photoshop in the RAW dialog box and you need to convert to JPG in order to use it. Hope this helps.
Brilliant!! You’ve taken the mystery out of HDR production and shown how easy it is with CS5.
Your’e a star!! 🙂
Your tutorial was great but I came to the point that I was happy with the image and clicked done and I keep ending up with just a really dark image – thought at first it was just a black mask!?
Nicely explained.. thanks for the wonderful work.. now i can make sharp images with the exact exposure i need.. thanks a lot..
Hi!
Nice post I was hoping to try it, but I dont have a camera though. Would really appreciate if you could share the images you used on this tutorial so that we may be able to try it. Thanks a lot ?
Hi John,
Sadly this is an old tutorial and I do not have Photoshop CS5 installed to my computer. if you got a Photoshop CS5 version, you can these files in the following path:
Program Files>Adobe>Adobe Photoshop CS5>Samples>Merge to HDR
These are samples files that got installed when you install Photoshop.
Hello, tried to follow this tutorial, got 1 problem, seems i cant press the ok button or cancel on the window. im not sure if my screen is too small. tried draging it… i can make the window smaller horizontally but not vertical. dragging the whole window down seems ok but not up… help!
Superb………could clear all my doubts..thank you so much for sharing..love it. 🙂
How can we make a nice hd photo in this tutorial it is very easy photo
with a dificult photo to edit
[…] Enlace:.graphicmania […]
[…] shop and your customer base. One way you can make your photos look as good as possible is to use photo manipulation software like Photoshop. Using software like this to drastically alter your photos is a bad idea; exaggerating some aspect […]
[…] How to Create HDR Photos in Photoshop CS5 […]
[…] How to create hdr photos in photoshop cs5 – graphic mania […]
send me a full version of cs6 photoshop website …. i shall be very thankful to you for this act of kindness
thanks