How To Use The Color Picker In Flash Tutorial
10
The application that we will be creating, is one you have seen on many website I am sure. A situation where you get to change the color of an object(a car, clothes, etc.). Ours we will be a simple one, but the lessons you learn here can apply to the more complex applications as well.
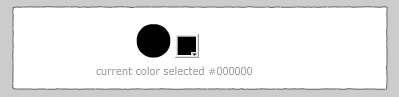
A preview of the final application.
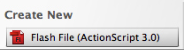
create a new flash file actionscript 3.0
use the size of 400 px by 100 px with a Grey background (#CCCCCC).
A preview of the layers that will be used in the flash file.
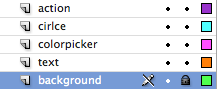
Create the following layers
Background – Create a background movieclip. Use the rectangle tool with a white fill color, and a stroke of width .10, and a fill of #666666, I am also using the ragged style. Convert to a movieclip, call it background. Make sue you set the background to back. Use Modify–>Arrange – > Send to Back. Lock the background layer.
Text – create two text fields.
The first one will be a static text field. Make the size of the text field W:153.65, H:19.00, and place it on the stage at X: 53.30, Y: 65.45. Type ” Current Color Selected” Inside the text field, and align the text to the right. I am using veranda for the text, be sure to embed your fonts.
The second field will go to the right of the first one, and will be a dynamic text field. Make the size of the text field W:135.85, H:19.00, and place it on the stage at X:205.80, Y: 65.55. Give this text field an instance name “myColor”, align the text to the left. I am using veranda for the text, be sure to embed your fonts.
colorpicker – grab the color picker component (windows–>components), and drag it to the stage. It should be above the 1st text field, and at the right corner. with dimensions X:175.45, Y:37.00.
circle – use the oval tool and create a circle to the left of the color picker. The size and color does not matter. My circle has a black (#000000) fill and no stroke. It’s dimensions are W:34.50, H:34.50. it is placed on the stage at X:136.20, Y:26.50.
We are done with the design, now open the actions panel and we will be adding some actionscript so that when the user picks a new color, from the color picker the circle changes color, and the text of what color is also changed. in the actions layer, right click on the 1st key frame and open the actions panel.
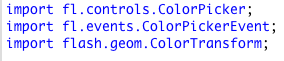
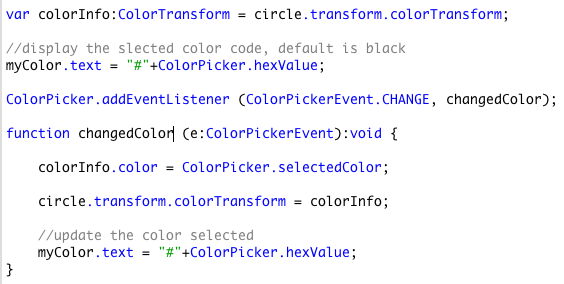
The first thing we need to do is to import the necessary classes
now will will set the default value for the color picker display. The default that is being used is the same color as the circle. Also, I am pre-defining the amount of colors that will be defined when the user clicks on the color picker. If you would like to have all the colors available, comment the line with ColorPicker.colors.

Next we set a variable for the colorInfo for the ColorTransform, and set the text field to display the current color, which is the default.
we add an EventListener to listen for a change to the color picker event, and call a changedColor function.
the changedColor function gets the new color and transforms it to the circle, and updates the text field with the new value for the hex value of the color.
If you are already a Premium Member then just sign in and you can download the source files of this tutorial.
Not a member? Sign up today or read more about our Premium Member area.


That is it, we are done. I hope that you enjoyed this tutorial, and that you learn something useful.
If you have any questions, be sure to leave a comment, or contact me.
Happy Flashing-

[…] How To Use The Color Picker In Flash Tutorial | Flash, Design … […]
[…] How To Use The Color Picker In Flash Tutorial | Flash, Design … […]
[…] See the rest here: How To Use The Color Picker In Flash Tutorial | Flash, Design … […]
[…] – Hack a Dayhow to easy replace Oil Pan | Drama ForumOmelet Made Easy | Southern PlateHow To Use The Color Picker In Flash Tutorial | Flash, Design …Flash Mob Metrotown Winter Olympics 2010 « ColdSip.com: Vancouver …Cinecode: Free Open Source […]
[…] Continue reading here: How To Use The Color Picker In Flash Tutorial | Flash, Design … […]
[…] How To Use The Color Picker In Flash Tutorial | Flash, Design … […]
Good tutorial on how to use color picker in flash
thanks, I am glad you liked the tutorial
Please send me a full ActionScript in one, cause I have mani errors(8) but want to know how
Answer soon on e-mail.
It didn’t work. Only gave me errors and flashed swatches everywhere.