Applying Old Movie Filter for Flash CS4 Animation
5Beyond creating animation SWF for the web, Flash is strongly used in creating video content for multiple outputs such as computers, web and mobile devices. in this small tutorial, I will give a clue about a hidden feature in exporting QuickTime video from Flash. One of the advantages of exporting Flash animation as QuickTime video is that it gives you the option to use video filters on the output video content.
Make sure not to miss our exclusive tutorials by joining our Free Resources News update here, free resources and tutorials will be send directly to your email.
Quick Time Dialog Box
In this article by Rafiq Elmansy , I will show how to use these filters from the Quick Time Export Dialog box. However, you can apply this tutorial on any Flash animation on the timeline as following:
- Open your Flash animation.
- Choose File menu > Export > Export Movie, and save your animation as Quick Time (.QT) video.
- The Quick Time Setting dialog box appears, choose Quick Time Settings button.
- From the Movie Setting dialog box choose Filter from the video section.
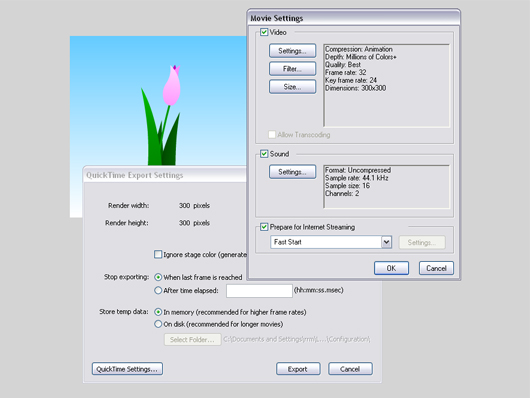
Figure01. Movie Setting for the Quick Time video outputAt this stage, The Choose Video Filter dialog box appears (figure 02) to allow you to browse filters from the left section. The right section of the dialog box lets you set the different settings for each filter and the left bottom box gives you a small preview for the video content.
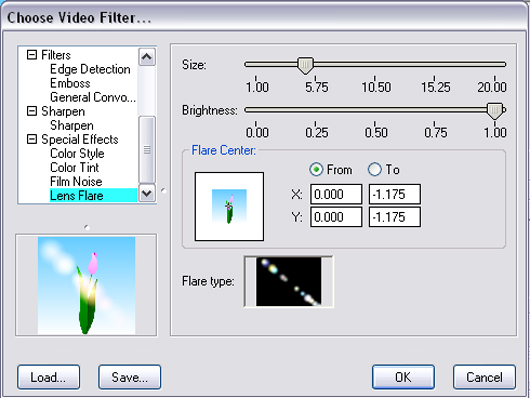
Figure 02. Video filter gallery dialog box.The video filter gallery includes good number of most used video filters that can be set over your animation video. For example, you can apply an animated lens flare over the video animation and you can create a tint color to overlay the animation with specific color and convert it to black and white.
Creating Old Movie Effect
Each of the listed filter has its own setting and properties that you can explore and select the setting that enables you to create your desired effect. So, here I will concentrate on one of the most used effects, which is adding the old movie effect with lines and grains animated all over the movie as in the following steps:
- From the Choose Video Filter dialog box, choose Film Noise filter.
- The preview section will show you how the output video look like.
- From the top right drop-down menu, you can choose the type of the effect, either Hairs and Scratches or Dust and Film Fades.
- Choose Hair and Scratches option from the drop-down menu, the effect options will appear in the properties section.
- The first part of the properties lets you set the Hair density and length.
- The second part lets you set the scratches density, duration and width. Set the options as in figure 03 or any values that meets your desired effect.
- The Load button allows you to load external effects in QFX format.
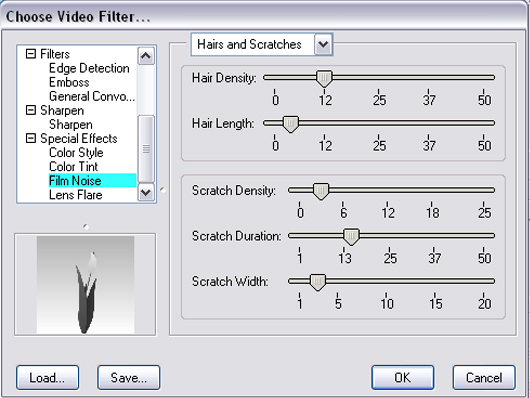
Figure 03. Film Noise filter settingsAfter applying your filter, click the Ok buttons to exit the filter gallery dialog box. and from the Quick Time Export Settings, choose the Export button.
Conclusion
The video filters effect can be used to create video effect on the Flash animation without the need to use video editing tools, it is simple and extends your capabilities from within Flash. The best practice is to try your own effects and see what will be the output be like we used to do with other software filters such as Photoshop filters and After Effects filters.


Hi, Congratulations to the site owner for this marvelous work you’ve done. It has lots of useful and interesting data.
ok well done by pro !
Hey very nice blog!! Man .. Beautiful .. Amazing .. I will bookmark your blog and take the feeds also…
It’s challenging to find knowledgeable folks on this topic, but you sound like you know what you’re talking about! Thanks
Pretty great publish even i may possibly say that complete internet website is wonderful. I preserve knowing new problems every one and just about every solitary evening from publish like these. extraordinary things!%%%