Embedding Fonts for Components in Flash
4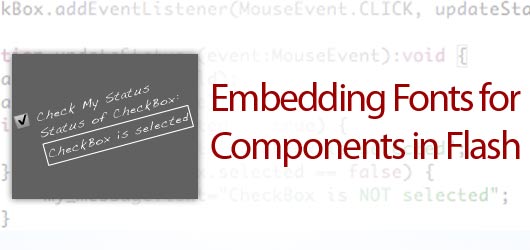
When using the components in flash you can use fonts that are embedded using actionscript 3.0 for more control of the design of the labels. You might have noticed that you can create a stunning flash application, with good colors, great fonts, but then when you use the components, such as the checkbox it is difficult to change the display text, which is the label of the checkbox. I will show you how you can change this using actionscript, and it will give you much better control of you labels.
Related posts:
- Create Your First Android AIR App in Flash
- How to Create a Snake Game in Flash Using AS3
- Creating Reflection in Flash Using AS3
- Bitmap Data Manipulation in Flash ActionScript 3
- Creating and Controlling Flash Animation with XML
- How to Build a XML Driven Quiz Application in Flash
- Approach to Understand XML and Flash Workflow
I will be using the checkbox, but this tutorial can be used for any component in flash CS 4. In a later tutorial I will show you how to use different methods for embedding fonts, as well as how to use a sub set of the font glyphs (to decrease the swf size) and how to add html and CSS at runtime.
I should be noted that when embedded fonts this way that you are embedded all the glyphs, so be careful of your swf size!
We will go over working with components in flash CS 4, working with actionscript to control our components and output. We will be working only with actionscript, so if you have not yet used actionscript to control the components, this will be an introduction, and if you have, then this will be a tutorial on how to embed fonts for a more controlled design.
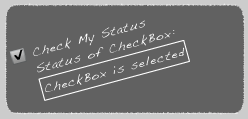
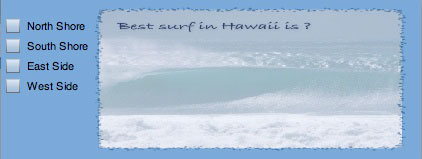
This is what you will be creating
Create a New Flash AS 3 document 250 px by 120 px with a background color of grey #333333.
Create two layers
(1) stage
(2) actions
In this app you could get away without having layers, but I feel it is a good practice.
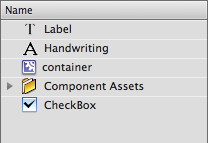
Next grab the components needed, the Label, the and Checkbox and drag them into the Library.
First lets create some style for the application. Take the rounded rectangle tool, and make a selection across the stage. I used dark grey fill with a white stroke,and stroke style of stippled. convert it to a movie clip(right click convert to movieclip) give it a name of container. Now in the properties panel choose Alpha, and give it a value of 70%
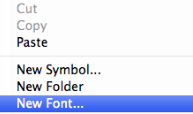
In the library panel, click the drop down menu on top panel (see arrow), select “New Font”. This open the Font Symbols Properties.
![]()
Click New Font
If you don’t see this set up, Click on advanced. We need a few parameters here
(1) The Font you want to embed
(2) Type (Regular, Bold, Italic, etc.)
(3) a name for the Font (I usually just call it the same as the font name, but it can be anything, such as MyFont, etc.)
(4) Export for actionscript, this will create the class needed for actionscript.
Please note actionscript is case sensitive Handwriting works but handwriting will not!
You can download this font if you already don’t have it from a pervious tutorial
Handwriting Font
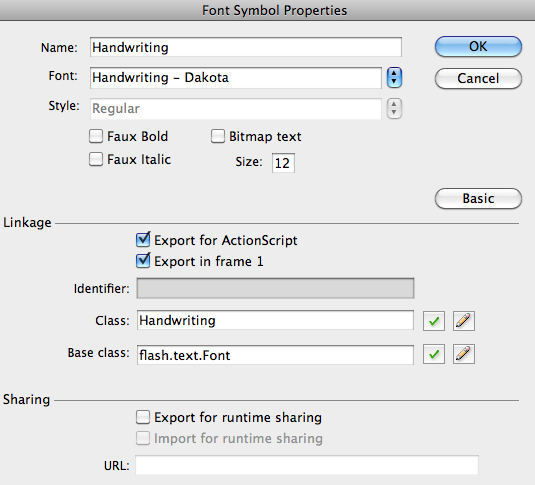
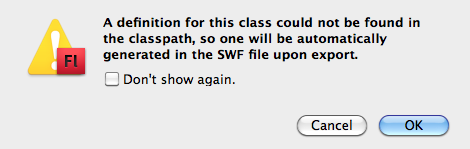
Click OK, and we you see this pop up, just click OK. It is just saying that the class”Handwriting” was not found, and will be created.
Make sure you have the components in the library
okay we are done with the set up, as we will be doing everything from actionscript this time-
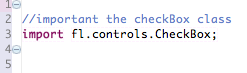
In the actions layer click the first frame, righ click get the actioncs panel
first we will import the classes needed, in this case just the checkbox controls
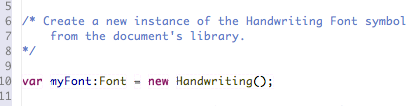
Since we have already defined our font symbol in your library and a linkage class defined to Handwriting,we can create a new instance of that font symbol using the new operator and specify the linkage class name defined earlier.
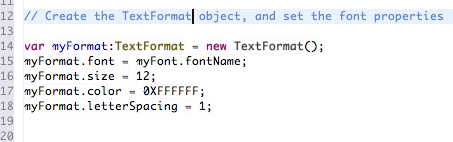
Now we set the formatting properties, using the text format, which we will set the font type, size, color, and spacing. There are many more possibilities as well.
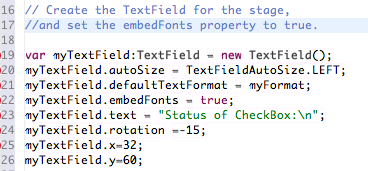
Now we will create a text felid to display a message when the user checks the checkBox. We are using the myFormat properties here in the text field, and setting the position of the text field (x=32, y=60).
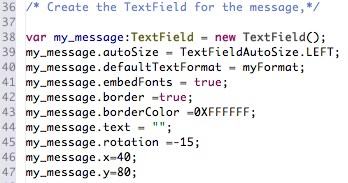
Now we will use the text field properties to display a message about the state of the checkbox;that is, is the checkbox is checked or it is not checked. again we are setting the similar properties to the text field using myFormat, and we add a border around the message,and we leave the message text balnk as we will add that in later. Also, we are giving the text field a rotation of -15 degrees.
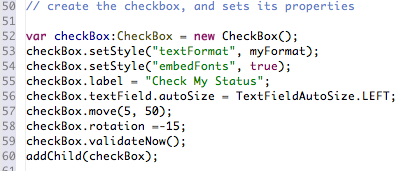
Now we will set the checkbox, we start by creating a variable for the checkbox,and setting the style again using myFormat. it is important to set the embedFonts to true! Then we set the position of the checkbox uses the .move(5,15), give it the same rotation, and adding it to the display list.
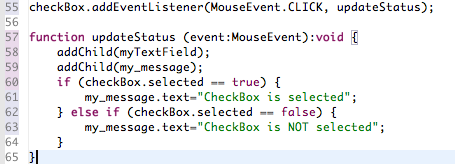
All that is left is add the EventListener to give a message to the user when the checkbox is checked or it is not checked. In the EventListener we call a function updateStatus. The first thing that we want to do is to add the text field and the my_massage propties to the display list.
Then we check the status of the checkbox and display a message that is passed to the my_message field. If the checkbox is selected, the message says,”CheckBox is selected”, otherwise we display a message saying, “CheckBox is not selected”
Well that is it for this tutorial,we covered a few things here, most importantly how to embed fonts and use them for the flash components. Also, how to use actionscript 3 to add the components and to style the label using embedded fonts and formatting.

Until next time happy flashing, and if you have any comments or questions please contact me-
Johnny


Hey!
thanks for this tutorial. I have an additional question however. I want to have multiple checkboxs that the user can check or not check, and have that information be saved until the .swf or .exe is opened again. Is that possible? This will not be a website, but an app someone uses
[…] Embedding Fonts for Components in Flash […]
Thank you very much it is very useful for me. happy new year! I like this tutorial. I want you add many useful tutorial for flash begiiners
Thanks alot, sure I will 😉