Creating Reflection in Flash Using AS3
4In this Flash tutorial we are going to see how to achieve a nice looking real time reflection using AS3.
Following are the techniques we shall cover along with this reflection trick.
1) Illusion of reflection.
2) Accessing symbols from library.
3) Flip symbols.
4) Drawing rectangle and filling it with gradient colour.
5) Masking.
6) 3D rotation.
7) Controlling rotation with mouse movement.
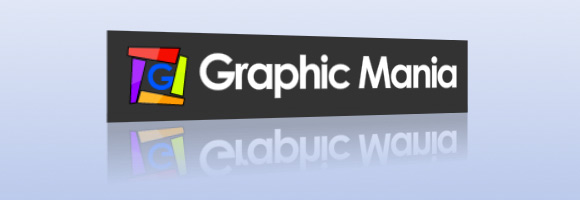
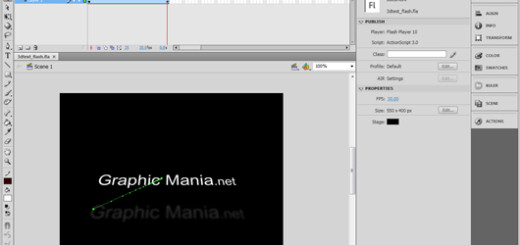
The final effect in this Flash tutorial should look like below:
Preparation
Let us first prepare Flash file setup before starting ActionScripting,
1) Create a new ActionScript 3 in Flash.
2) Create a new Movie Clip and name it “myLogo_mc” with the Linkage Identifier (i.e class definition) named as “myLogo” in library panel. We shall use this Linkage Identifier “myLogo” to access “myLogo_mc” through ActionScript.
Accessing Library Symbols
Our stage is still empty. We have our main actor and co-actors all resting in the library. We need to call our actor on the stage. How will we call our main actor?
Observe the Library panel. We have already set Linkage name “mylogo” (highlighted with red rectangle).
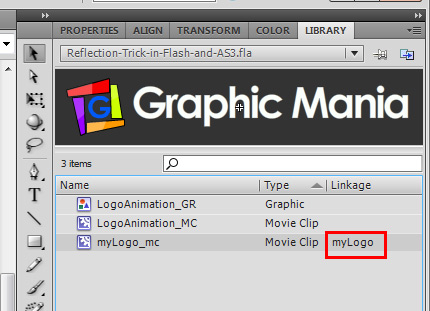
We shall use this Linkage name in our script to call our actor “myLogo_mc”. Let us do it right now, Place the following lines in ActionScript panel and test the movie.
var logo:myLogo = new myLogo ( ); //Instance of library symbol
addChild ( logo ); // Adding symbol to the stage
The Linkage name “myLogo” represents Class Definition for the movieclip “myLogo_mc” which is our main actor.
You can specify this Linkage name in three ways.
1) Simplest way is to double click in front of that symbol under “Linkage” column. A text field gets activated and type the name in that text field.
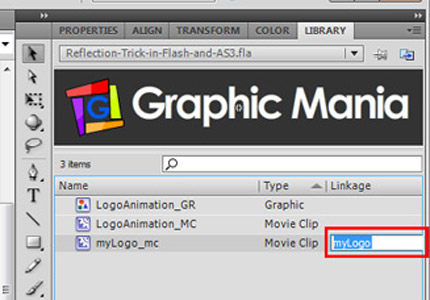
2) Or at the time of symbol creation in advance view check “Export for ActionScript”.
3) Or in library panel right click the symbol and go to “Properties”.
Placing Symbol In Centre Of The Stage
We want our actor to be placed in centre of the stage. Before that, please make a note, the registration point of our actor is at the centre. If you want to have a look, temporarily drag “myLogo_mc” from the library on to the stage. When you are done delete this symbol.
OK. To place our actor in centre of the stage, add the following lines in our script.
//x and y position of main object i.e. at stage centre
logo.x = stage.stageWidth / 2; //Horizontal centre of the stage
logo.y = stage.stageHeight / 2; //Vertical centre of the stage
Tricky Math… And we have our actor at perfect centre. Now move towards “Reflection”.
Preparing For Reflection
We are calling this effect as a trick since it is not a reflection achieved using ray tracing. Reflections (especially in 3d) are generated using ray tracing algorithm which has a very complex maths behind it. Hence takes considerable time for calculations and rendering.
In our case, we are making an illusion of reflection.
We shall be performing following steps to achieve the reflection.
1) We need a copy of our main symbol.
2) Place this copy below main symbol.
3) Flip the copied symbol vertically.
4) Apply gradient mask to this flipped symbol to make an illusion of reflection falloff.
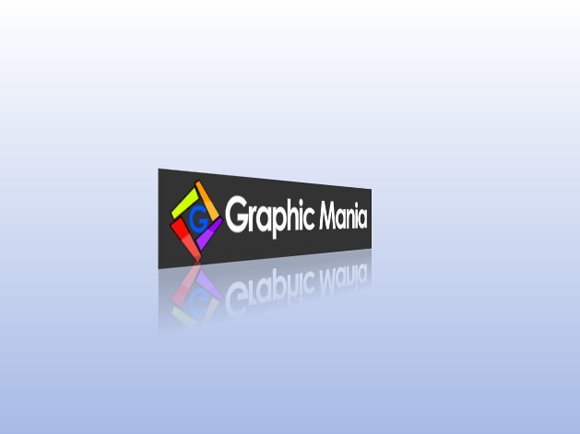
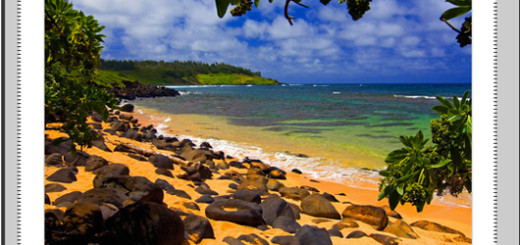
See the following image for better understanding,
Flipping a Symbol
To achieve the reflection we need a copy of our main actor. So add following lines to our script in order to create a copy.
var logo_Reflection:myLogo = new myLogo ( );
addChild ( logo_Reflection );
A copy of our actor is added but the position is not what we want. We need this copy exactly below our actor and of course vertically flipped.
To place the copied symbol below our actor, add following lines,
//Only x position of reflection movieclip at stage center
logo_Reflection.x = stage.stageWidth / 2;
//y position of reflection movieclip i.e below main movieclip
logo_Reflection.y = logo.y / 2 + logo.width / 2;
Now it is below our main logo but not vertically flipped. Flipping is very simple. Add following lines to our script,
logo_Reflection.scaleY = -1;
Since we wanted vertical flip, we scaled along Y axis for vertical scaling and -1 for flipping.
Good Stuff…. Now we are very close to our target. Apply masking and we are done.
Apply Mask
To make reflection more realistic we need to apply reflection falloff as discussed in “Preparing For Reflection” section.
If you are familiar with Photoshop then think of in Quick Mask mode with gradient (mostly linear gradient) applied to that layer. We will be doing the same thing but using ActionScript.
We need to do following tasks,
1) A rectangle of same size of our copied logo.
2) Linear Gradient Colour applied to the above rectangle.
3) Using this rectangle as a Mask for our copied logo.
See the image below for better understanding,

To create above effect we shall create an user defined function drawMask().
So add the following lines to our code.
function drawMask ( )
{
//Statements
}
How the above function will create mask? We need to put some logic. We need some arguments to pass in it and some statements.
What will be the list of arguments?
function drawMask ( arg1, arg2, arg3, arg4, arg5, arg6 )
{
//Statements
}
We need total number of 6 arguments to draw mask.
arg1 and arg2 will be for width and height of rectangle used as mask. See below how it will look in the code,
var W : Number = logo_Reflection.width; //Width for rectangle used as mask
var H : Number = logo_Reflection.height; //Height for rectangle used as mask
function drawMask ( W, H, arg3, arg4, arg5, arg6 )
{
//Statements
}
arg3 will be an array holding colours for linear gradient (we will use two colors).
arg4 will be an array holding alpha values of colours for linear gradient.
arg5 will be an array holding values for positions of colours for linear gradient.
arg6 will be an matrix. This will give access to createGradientBox ( ) method of Matrix Class.
Let us see how the drawMask ( ) function will look like now.
var W : Number = logo_Reflection.width; // Width for rectangle used as mask
var H : Number = logo_Reflection.height; // Height for rectangle used as mask
var colors:Array = [ 0 x 000000,0 x FFFFFF ]; // Two colours for linear gradient
var alphas:Array = [ 0, 0.3 ]; // Alpha values for those two colours
var ratios:Array = [ 50, 200 ]; // Position of those two colours
var mat:Matrix = new Matrix ( ); // Used to call createGradientBox ( ) method
function drawMask ( W, H, colors, alphas, ratios, mat )
{
//Statements
}
The function drawMask ( ) is now fully equipped with ingredients. It’s time to cook now.
We will build our drawMask ( ) function gradually in order to understand its working.
First we shall create a shape object. We shall draw a rectangle in this shape object later.
.
.
.
.
function drawMask ( W, H, colors, alphas, ratios, mat )
{
var maskingShape:Shape = new Shape();
logo_Reflection.addChild(maskingShape);
//position of the maskingShape w.r.t position of logoReflection
maskingShape.x = -logo_Reflection.width/2;
maskingShape.y = -logo_Reflection.height/2;
}
We added the “maskingShape” to “logo_Reflection” so that no need to worry about position and rotation of the shape. It will always be with “logo_Reflection”.
Now we shall call createGradientBox ( ) method of matrix class as shown below (bold line)
.
.
.
.
function drawMask ( W, H, colors, alphas, ratios, mat )
{
var maskingShape:Shape = new Shape();
logo_Reflection.addChild(maskingShape);
//position of the maskingShape w.r.t position of logoReflection
maskingShape.x = -logo_Reflection.width/2;
maskingShape.y = -logo_Reflection.height/2;
mat.createGradientBox ( W, H, 90 * (Math.PI / 180 ));
}
Why createGradientBox( ) method? What it does?
This createGradientBox( ) is specially developed for “beginGradientFill()” and “lineGradientStyle()” methods. These methods require a matrix to apply gradient colours. This createGradientBox( ) method provides a required matrix to these methods.
Since we are going to use “beginGradientFill()” in our next step to fill a rectangle with gradient colour, we created a matrix using createGradientBox( ).
This createGradientBox( ) requires at least two argument (width and height). We already passed three arguments.
arg1 = W. Width for gradient box equal to logo_Reflection.width.
arg2 = H. Heigth for gradient box equal to logo_Reflection.height.
arg3 = This is angle of rotation for gradient box.
We wanted our linear gradient applied horizontally so it was needed to rotate 90 rad. Yes we need angle in radians. Hence to obtain angle in radians we used standard formula (radians = degrees * Math.PI / 180 ) as,
90 * ( Math.PI / 180 )
Fine. We are close to complete drawMask() method.
Now we can create a rectangle with gradient colour applied. Add following lines (Bold lines)
.
.
.
.
function drawMask ( W, H, colors, alphas, ratios, mat )
{
.
.
.
mat.createGradientBox ( W, H, 90 * (Math.PI / 180 ));
//Draw rectangle equal to “logo_Reflection” with linear gradient applied
maskingShape.graphics.beginGradientFill ( GradientType.LINEAR, colors, alphas, ratios, mat );
maskingShape.graphics.drawRect ( 0, 0, W, H );
}
About newly added lines in the above code (bold lines), the first line,
maskingShape.graphics.beginGradientFill ( GradientType.LINEAR, colors, alphas, ratios, mat );
This “beginGradientFill()” method applies linear gradient colours with alpha values, placement and rotation of gradient matrix. The arguments passed to this methods we already discussed at the start of this section.
The second line,
maskingShape.graphics.drawRect ( 0, 0, W, H );
The above line draws a rectangle equal to “logo_Reflection”.
If you test the movie you will see a rectangle with linear gradient applied is added over “logo_Reflection” symbol.
The final goal is to convert this rectangle into mask and boom we will have “Reflection Falloff”.
So let us convert the rectangle into mask as follows (bold lines),
function drawMask ( W, H, colors, alphas, ratios, mat )
{
.
.
.
//Draw rectangle equal to “logo_Reflection” with linear gradient applied
maskingShape.graphics.beginGradientFill ( GradientType.LINEAR, colors, alphas, ratios, mat );
maskingShape.graphics.drawRect ( 0, 0, W, H );
//Convert rectangle into MASK
logo_Reflection.cacheAsBitmap = true;
maskingShape.cacheAsBitmap = true;
logo_Reflection.mask = maskingShape;
}
drawMask( W, H, colors, alphas, ratios, mat );
About newly added lines in the above code (bold lines), Observe that we have converted both “logo_Reflection” and “maskingShape” into bitmap data using cacheAsBitmap property. When cacheAsBitmap property of display object is set to true all vector data is cached and drawn to bitmap. Once as a bitmap, you can apply effect like the one we want “Reflection Falloff”.
Then we set maskingShape as a mask for “logo_Reflection”.
In the last sentence,
Finally we called our completed method drawMask( W, H, colors, alphas, ratios, mat ) to apply mask.
Test the movie. You have a “Reflection Falloff effect” applied to “logo_Reflection”. Try tweaking values for color, alphas, ratios. You can also try changing rotation by tweaking “90 * ( Math.PI / 180 )” in “createGradientBox()” method.
Goal… Now we have reached to a good level. So let us see how our final code including comments will look like, at this stage,
//Get and place a movieclip as main object from library using identifier “myLogo”
var logo:myLogo = new myLogo();
addChild(logo);
//x and y position of main object i.e. at stage centre
logo.x = stage.stageWidth/2;
logo.y = stage.stageHeight/2;
//Get and place same movieclip this time for reflection
var logo_Reflection:myLogo = new myLogo();
addChild(logo_Reflection);
//Only x position of reflection movieclip at stage center
logo_Reflection.x = stage.stageWidth/2;
//Flip the reflection movieclip vertically
logo_Reflection.scaleY = -1;
//y position of reflection movieclip i.e below main movieclip
logo_Reflection.y = logo.y/2 + logo.width/2;
//DRAW MASK
var W : Number = logo_Reflection.width; // Width for rectangle used as mask
var H : Number = logo_Reflection.height; // Height for rectangle used as mask
var colors:Array = [ 0x000000, 0xFFFFFF ]; // Two colours for linear gradient
var alphas:Array = [ 0, 0.3 ]; // Alpha values for those two colours
var ratios:Array = [ 50, 200 ]; // Position of those two colours
var mat:Matrix = new Matrix ( ); // Used to call createGradientBox ( ) method
function drawMask ( W, H, colors, alphas, ratios, mat )
{
var maskingShape:Shape = new Shape();
logo_Reflection.addChild(maskingShape);
//position of the maskingShape w.r.t position of logoReflection
maskingShape.x = -logo_Reflection.width/2;
maskingShape.y = -logo_Reflection.height/2;
mat.createGradientBox ( W, H, 90 * (Math.PI / 180 ));
//Draw rectangle equal to “logo_Reflection” with linear gradient applied
maskingShape.graphics.beginGradientFill ( GradientType.LINEAR, colors, alphas, ratios, mat );
maskingShape.graphics.drawRect ( 0, 0, W, H );
//Convert rectangle into MASK
logo_Reflection.cacheAsBitmap = true;
maskingShape.cacheAsBitmap = true;
logo_Reflection.mask = maskingShape;
}
drawMask( W, H, colors, alphas, ratios, mat );
We have achieved “Reflection Falloff”. We can add more drama to the scene by applying rotation (especially y-axis rotation).
Ready…. to add rotation.
Adding 3D Rotation
Thanks to ActionScript3. Adding 3D rotation (May call it as 2.5 D rotation) is very easy, for e.g.
target.rotationY = 45;
Let us add rotation to our example. Add following lines to our script and test the movie,
//2.5D Rotation
var rotationSpeed:int = 1;
function _onEnterFrame( e:Event ):void {
yAxisRotation( logo );
yAxisRotation( logo_Reflection );
}
stage.addEventListener( Event.ENTER_FRAME, _onEnterFrame );
function yAxisRotation( tar ):void {
tar.rotationY += rotationSpeed;
}
Interesting Look… How about controlling rotation with mouse movement?
Controlling Rotation with Mouse Movement
It always makes attractive if you give some control to your audience. Here we shall give a control on a direction of rotation. If user moves mouse towards right the rotation will be from left to right and vice versa.
Let us change our previous function “yAxisRotation( )” as shown (Bold lines),
function yAxisRotation(tar):void{
if(goLeft){
tar.rotationY += rotationSpeed;
}else
if(goLeft){
tar.rotationY -= rotationSpeed;
}
}
We added conditional statements which controls the rotation depending on the mouse position. These conditional statements consists of “goLeft” and “goRight’ Boolean values. To control these values, we have created the following function. Add these lines to our code,
var goLeft:Boolean = true;
var goRight:Boolean = false;
function leftOn( e:MouseEvent ){
if( mouseX < stage.stage.width/2 ){
goRight = false;
goLeft = true;
}else
if( mouseX > stage.stage.width/2 ){
goLeft = false;
goRight = true;
}
}
stage.addEventListener( MouseEvent.MOUSE_MOVE, leftOn );
The above function sets the “goLeft” or “goRight” Boolean values depending on the mouse position of the stage. Position on right set rotation from left to right and vice versa.
Feels Very Nice…. when we are controlling something with input device.
So friends, that’s it for now. We will meet soon with brand new topic.
The Final Code:
//Get and place a movieclip as main object from library using identifier “myLogo”
var logo:myLogo = new myLogo();
addChild(logo);
//x and y position of main object i.e. at stage centre
logo.x = stage.stageWidth/2;
logo.y = stage.stageHeight/2;
//Get and place same movieclip this time for reflection
var logo_Reflection:myLogo = new myLogo();
addChild(logo_Reflection);
//Only x position of reflection movieclip at stage center
logo_Reflection.x = stage.stageWidth/2;
//Flip the reflection movieclip vertically
logo_Reflection.scaleY = -1;
//y position of reflection movieclip i.e below main movieclip
logo_Reflection.y = logo.y/2 + logo.width/2;
//DRAW MASK
var W : Number = logo_Reflection.width; // Width for rectangle used as mask
var H : Number = logo_Reflection.height; // Height for rectangle used as mask
var colors:Array = [ 0x000000, 0xFFFFFF ]; // Two colours for linear gradient
var alphas:Array = [ 0, 0.3 ]; // Alpha values for those two colours
var ratios:Array = [ 50, 200 ]; // Position of those two colours
var mat:Matrix = new Matrix ( ); // Used to call createGradientBox ( ) method
function drawMask ( W, H, colors, alphas, ratios, mat )
{
var maskingShape:Shape = new Shape();
logo_Reflection.addChild(maskingShape);
//position of the maskingShape w.r.t position of logoReflection
maskingShape.x = -logo_Reflection.width/2;
maskingShape.y = -logo_Reflection.height/2;
mat.createGradientBox ( W, H, 90 * (Math.PI / 180 ));
//Draw rectangle equal to “logo_Reflection” with linear gradient applied
maskingShape.graphics.beginGradientFill ( GradientType.LINEAR, colors, alphas, ratios, mat );
maskingShape.graphics.drawRect ( 0, 0, W, H );
//Convert rectangle into MASK
logo_Reflection.cacheAsBitmap = true;
maskingShape.cacheAsBitmap = true;
logo_Reflection.mask = maskingShape;
}
drawMask( W, H, colors, alphas, ratios, mat );
//2.5D Rotation
var rotationSpeed:int = 1;
function _onEnterFrame(e:Event):void{
yAxisRotation(logo);
yAxisRotation(logo_Reflection);
}
stage.addEventListener(Event.ENTER_FRAME, _onEnterFrame);
function yAxisRotation(tar):void{
if(goLeft){
tar.rotationY += rotationSpeed;
}else
if(goRight){
tar.rotationY -= rotationSpeed;
}
}
//Controlling Rotation with mouse movement
var goLeft:Boolean = true;
var goRight:Boolean = false;
function leftOn(e:MouseEvent){
if( mouseX < stage.stage.width/2 ){
goRight = false;
goLeft = true;
}else
if(mouseX > stage.stage.width/2 ){
goLeft = false;
goRight = true;
}
}
stage.addEventListener(MouseEvent.MOUSE_MOVE,leftOn);
Conclusion
Now you know how to create ‘Illusion of Reflection”. During the journey in this Flash tutorial, we saw the following terms,
1) Illusion of reflection.
2) Accessing symbols from library.
3) Flip symbols.
4) Drawing rectangle and filling it with gradient colour.
5) Masking.
6) 3D rotation (May call it as 2.5D).
7) Controlling rotation with mouse movement.
[amember_protect guests_only]If you are already a Premium Member then just sign in and you can download the source files of this tutorial.
Not a member? Sign up today or read more about our Premium Member area.


Thank you for a useful article! It’s really great that there are such authors that are great in programming, and are ready to share their knowledge with us!
Thanks Sandra 😉
different and a nice application
you are great , wish if all can give like you , thanks