Creating Animation with Audio in Photoshop CS6 Tutorial
35The release of Photoshop CS6 presents another revolutionary step in the history of Photoshop. While the previous releases of Adobe Photoshop formed a real and significant change in the development of Photoshop, the latest version, Photoshop CS6, definitely comes with some amazing new and improved features, such as the 3D feature, content-aware and the animation timeline enhancements.

Although animation in Photoshop is not a new feature, it has improved a lot in Photoshop CS6. In the new Photoshop timeline you can now add video layers, modify video content, build animation and add audio.
In this Photoshop tutorial we will shed light on this feature through the following example. We will use the timeline to create an animated into through adding a video layer and creating text animation.
Related posts:
- Quick Tip: How to Create a Seamless Pattern in Photoshop
- How to Create Islamic Style Poster in Photoshop
- How to Create a Photo Manipulation Poster in Photoshop
- Amazing Photo Manipulation Tutorials
- How to Create a Comic-Book Style Image of Yourself
- How to Create HDR Photos in Photoshop CS5
This article requires you to have a basic knowledge of both Photoshop and the concept of animation. You can download the beta version of Photoshop CS6 from this link.
Before we jump to the tutorial, let us preview the final look of the animation below:
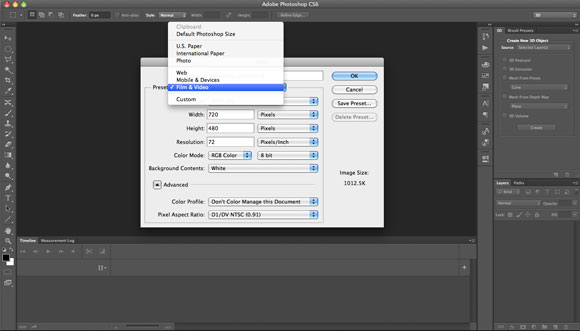
Step1
Create a new Photoshop document by choosing New from the File menu. In the New Document dialog box, choose Film and Video from the Presets list.
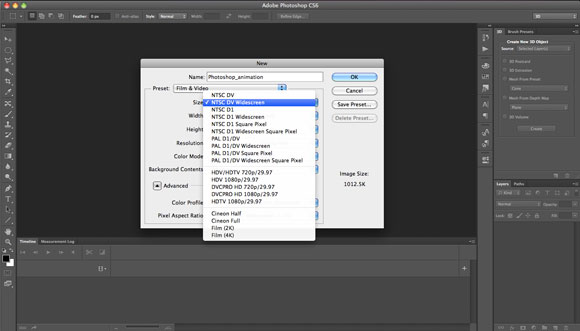
Step2
From the Size, choose NTSC DV Widescreen. This will set the document size, aspect ratio and animation frame per second to meet with the NTSC video standards.
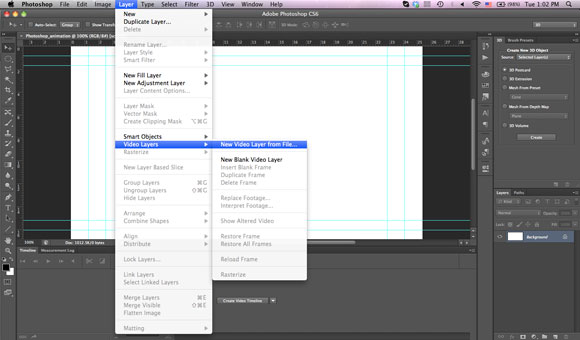
Step3
From the Layer menu, choose Video Layers> New Video Layer From File. Navigate to the video Freemoonriseoverwater.mov and click Open. Due to the size of the video file, you can download a free copy of it from the following link:
http://www.stockfootageforfree.com/time-lapse/free-timelapse-stock-footage-moonrise-over-water
Step 4
On the Timeline panel, you will notice that the video layer appears in the timeline. If you do not see it choose Create Video Timeline from the Timeline panel.
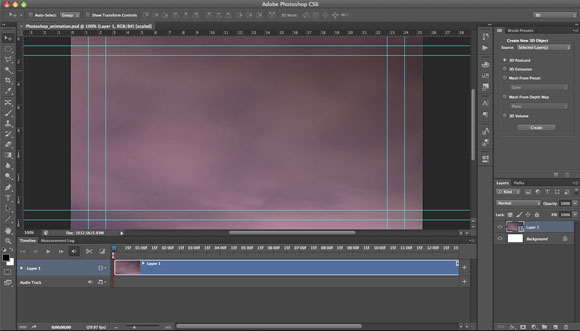
Step 5
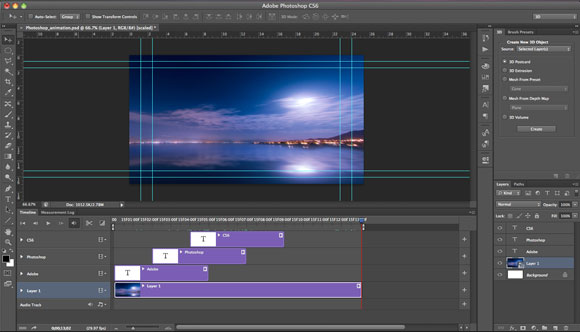
Now, we will resize the video to fit the stage. Press Cmd+T (Ctrl+T in Windows) for Free Transform. You will get an alert message that the video will be converted into a Smart Object. Press Ok and resize the video to fit in the stage. You can hold the Shift Key while resizing to maintain the video aspect ratio.
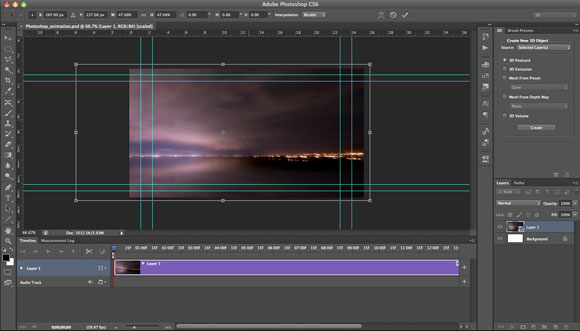
There is a slider in the bottom of the Timeline panel, you can drag it to the right or left to zoom the timeline and reveal more frames of the animation. You can notice this through the frame numbers on the top of the Timeline panel.
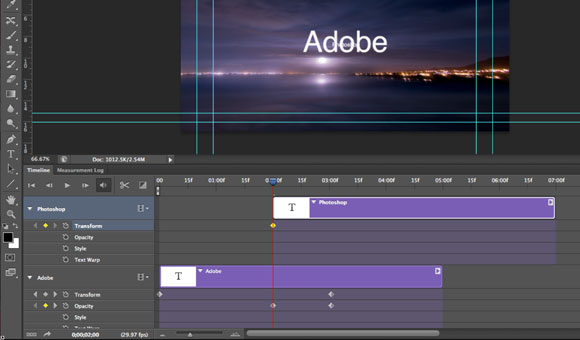
Step 6
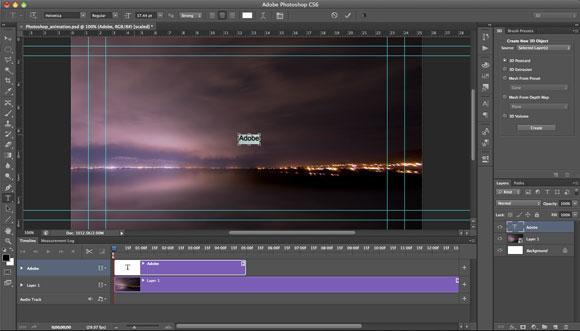
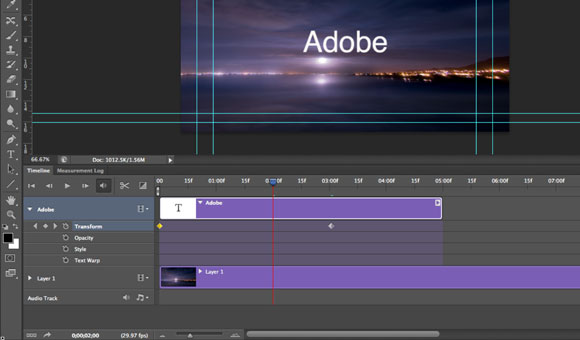
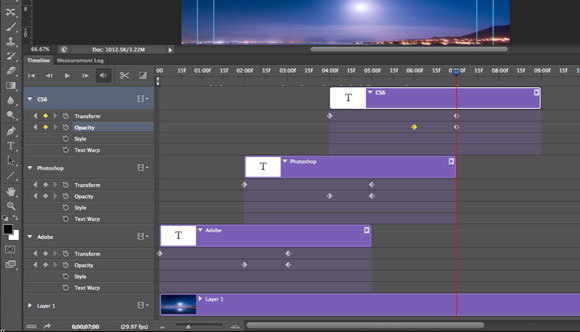
Using the Type tool, write the word “Adobe” in the middle of the screen and make it small like the one in the figure below. Note that a new animation layer appears on the timeline to allow you to animate the text.
Step7
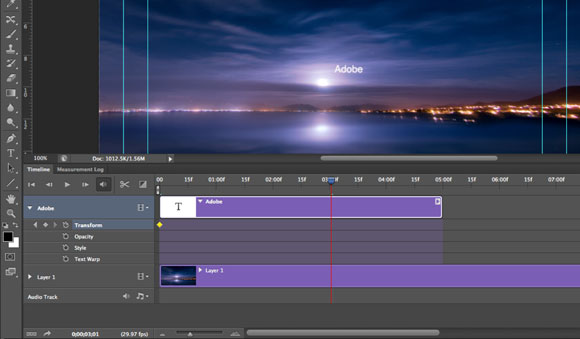
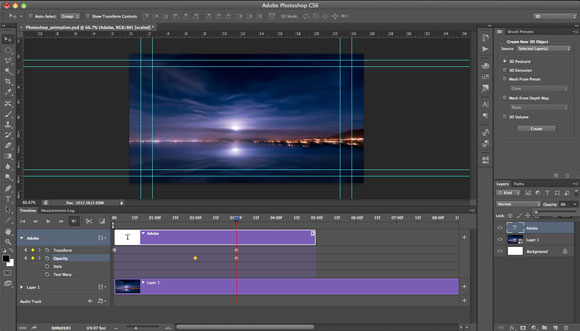
In the Timeline panel, Click the arrow next to the text layer and click the small stopwatch icon next to the Transform property. This enables you to transform the text, such as moving and scaling.

Step8
Move the timeline indicator to frame number 03:00, which means the 3rd second of the animation.
Step9
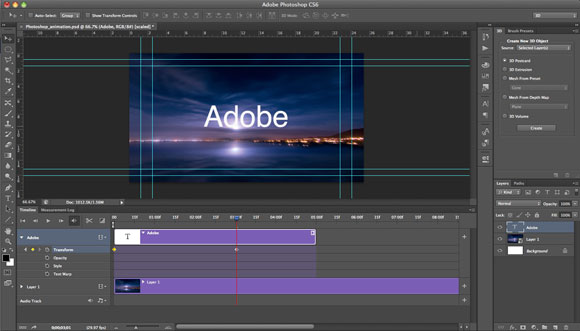
Scale the text up like in the figure below and place it in the center of the screen.
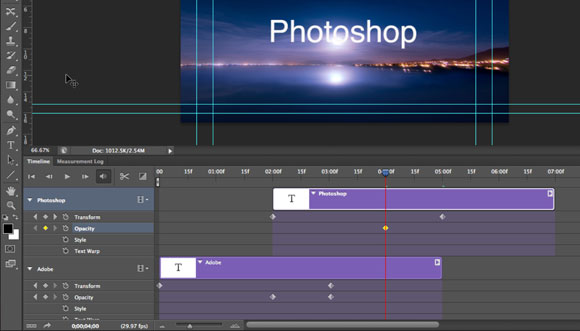
Step10
Move the timeline indicator to frame number 02:00, which means the 2nd second of the animation.
Step11
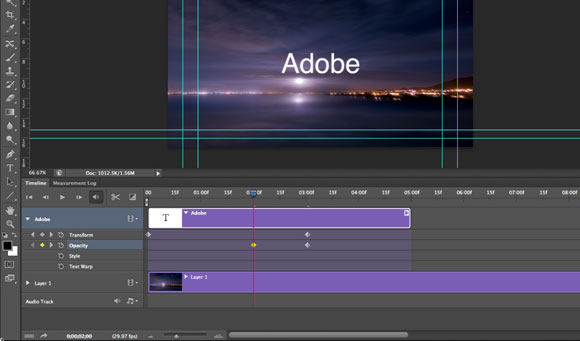
Click on the stopwatch icon next to the Opacity value. This activates the opacity on the text animation.

Step 12
Now, move the timeline indicator to the end of the text animation on frame 03:00f. From the Layers panel, set the Opacity of the text to zero.
Step13
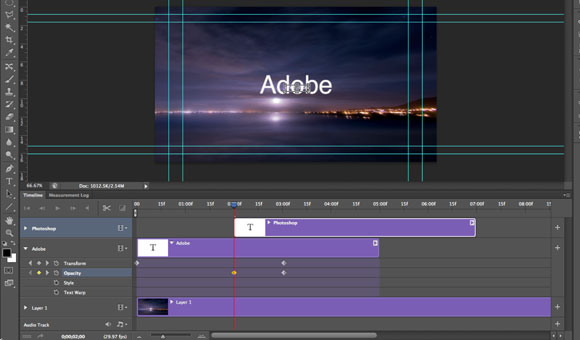
Move the timeline indicator to frame number 02:00f again. At that point we will create a new text that will appear while the first one fades.
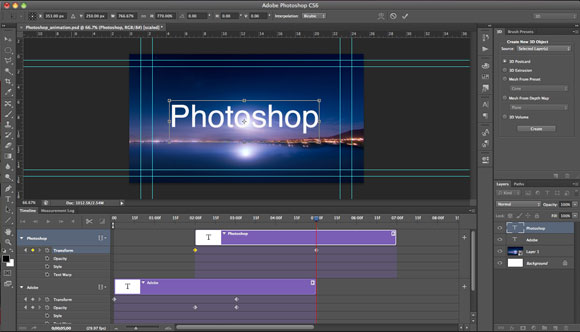
Step14
Using the Type tool, create a new text “Photoshop”. Make it small and place it in the middle of the screen as we did with the previous text.
Step15
Click the stopwatch icon next to the Transform property layer.
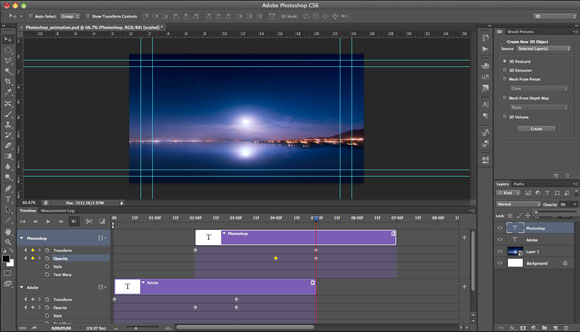
Step16
Move the timeline indicator to frame number 05:00f, this is the 5th second of the animation. Scale the text up as we did with the previous one.
Step17
Move the timeline indicator back to frame number 04:00f, click the stopwatch next to the Opacity property.
Step 18
Move again to the end of the animation of the second text on frame 05:00f. Set its opacity to 0 from the Layers panel.
Step19
Move the timeline indicator to frame number 04:00f and create a new text layer. Add the word “CS6” to this layer.

Step 20
Repeat the previous steps to scale and change the opacity of the text. We will have three text animations that fade after the 7th second of the animation.
Step21
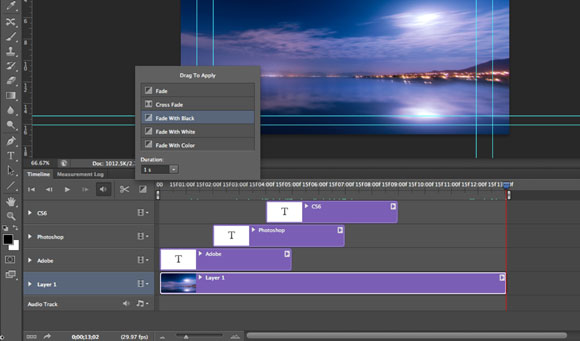
Move the timeline indicator to the end of the video animation layer.
Step22
On the top left of the Timeline panel, select the square transition icon next to the scissors icon. This icon opens a floating menu that allows us to see the available transitions.
Step23
Select Fade to Black and drag to the end of the video animation layer. This will apply a fade to black transition to the end of the animation. You can preview the animation by pressing the Spacebar in your keyboard or click the Play button in the Timeline panel.
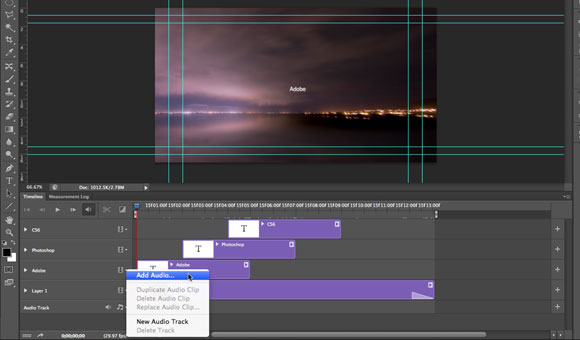
Step24
Now, we will add audio track to the animation. In the Timeline, you can find the bottom layer called Audio Track. Click the music icon on the right side of the audio layer and choose Add Audio. Navigate for the audio track Mystical_10sec.mp3. You can download it from the following URL:
http://www.stopmotionpro.com/index.php?option=com_content&view=article&id=43&Itemid=34
Then, click Open to add it to the time line.
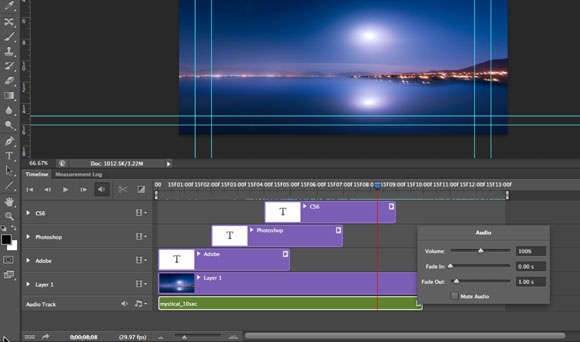
Step25
At the end of the animation, click on the arrow at the end of the audio layer. In the fade out value, set it to 1 sec to fade the sound by the end of the sound track.
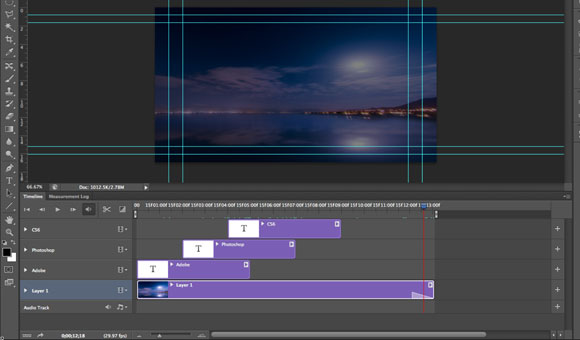
You can drag the video layer from the end side to crop it. So, it ends in the same time of the audio track.
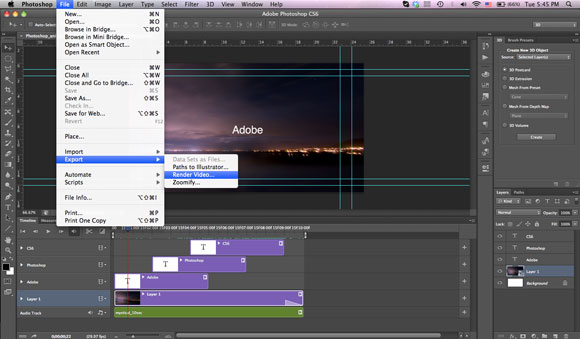
At this point we have finished creating the animation. In the next steps we will render this animation into video format as follows:
Step26
On the top of the Timeline frame numbers you can find the two brackets in the beginning and the end of the Timeline layer. Make sure to move these brackets to include only the animation frame. These brackets set the frame that will be rendered.

Step27
From the File menu, choose Export>Render Video.
Step28
In the Render Video dialog box, set the name of the video and the path where you would like to save it.
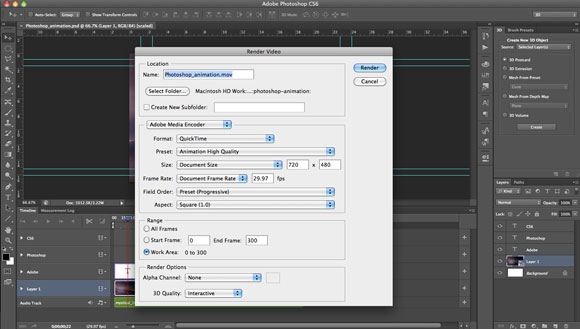
Step 29
Set the render format to Adobe Media Encoder and choose QuickTime format. Set the Presets to High Quality and the size and frame rate as the same. It will be rendered using the same size and rate of the presets we had selected at the beginning of the animation.
In the Range area, set the render area to Work Area, this will only render the frames inside the brackets we have mentioned above.
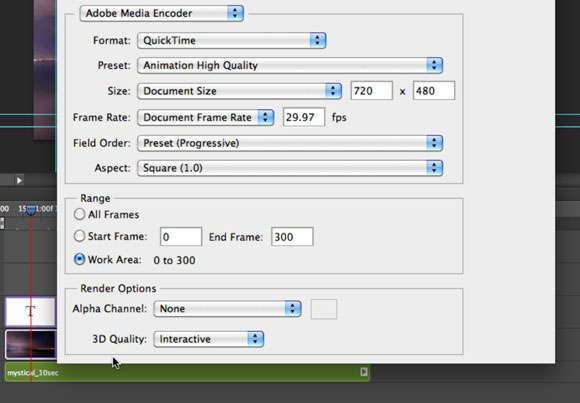
Click the Render button to render the video that should appear as below.
In this tutorial we have overviewed how to create a video animation in Photoshop CS6 using the enhanced Timeline panel. There are many features and options associated with animation in Photoshop and this tutorial intends to overview the video building process so you can start exploring the different animation capabilities of Photoshop CS6 from here.
Now the animation is ready to eventually be published on a video-sharing website; alternatively you can use our A2 Hosting coupons to create your own video hosting site for an affordable price; A2 Hosting offers the best video hosting site softwares, such as ClipBucket, CumulusClips and phpMotion, on fast servers with free SSD storage and SSL certificate.
In the next tutorials we will cover more Photoshop CS6 features. So, please add your comments and questions to increase the benefits of this tutorial.


Is there any way to strip audio off of a clip? For example, let us say that I took video of my cats and I wanted to get rid of the background sounds (kids, TV, lawnmower) so that I could then add music to make for a more pleasant sounding video. Is there a way to separate the original sound from the video?
Amazing new features in CS6. The animation tools seem very advanced for what is essentially a photo editing package!
I believe you can just delete the sound track of the current video from the Audio layer. Also, you can replace it with your own custom track.
Hi I saw this animation on youtube
http://www.youtube.com/watch?feature=player_embedded&v=COSUwqRQMP4
and it says it used photoshop to create everything in the intro animation using screenshots can anyone tell me how I can do this?……….
by learning this tutorial, you will be able to understand the concept of animation in Photoshop.
Awesome Animation in Photoshop. Nice looking and helpful, user friendly tutorial. Thanks for share it. I’m feeling lucky by learning this tutorial.
Can you do this in the standard version of CS6 or do you need Photoshop Extended?
Yes, the animation feature is available in Photoshop CS6 standard version as the Adobe site mentions here:
http://www.adobe.com/products/photoshop/features._sl_id-contentfilter_sl_featuredisplaytypes_sl_all.html
Referring to a question above, Regarding CS6, is there a way to remove audio from a smart object? Also I haven’t successfully found a ‘back button’ to undo recent changes.
You can disable the audio from the video layer when importing the video in Photoshop, hope this is what you mean.
i have photoshop cs6 but i cannot open files with the mov extension why is there some plugin or other wise or extension
This is wonderful and you made it all so easy to understand. I have had Flash for years and never really used it because it all seemed so “heavy duty”.
Thank you for making it easy to learn how to use the timeline!
Can you explain to us about the various publishing formats?
For instance, this is an MP4 Movie now, is that a fairly universal format that Mac and PC users can read in any browser? Do most players: QT, Flip4Mac, Windows players, etc. read this? Do they need a player at all to view it?
I have always been hesitant to create “real” videos for my clients because not all website visitors can watch them – Flash has become passe and never was universal anyway…
I try to create animated .gifs whenever possible because I know those are universal — but can’t add audio to them. And, can’t use the real video clips either.
This new CS6 PSD is awesome! And so are you, thank you. 🙂
Hi Claudia,
Thank you for your comment and happy that you liked the tutorial. I tried to explain the different video format in my book Photoshop 3D for Animators http://bit.ly/PS-3D. I will try to cover this in a later tutorial.
Regarding creating animation in Flash. You can export your animation as Quick Time or FLV. Then, you can use this video more freely than the SWF animation.
Hi claudia. Your tutorial is nice and I have a problem while following steps I have a problem in step 3 … When I click new layer from file and select the file it shows “dynamic link not available”
help me out……………!
Hi Rafiq Elmansy, this is an extraordinary site..
I would be very thankful for this tutorial. and much more thankful if you help me to clear my problem.
When I try to open a video of .mov it show ” Dynamic link not available”
when I searched in net and found they told me to restart photoshop cs6 and try again but it dont open and I hope you understood my problem so please help me Waiting for your reply….
I thank once again for this nice tutorial………….
Hi,
thank you and I am glade that you like the tutorial. This problem usually happend when the video used in the PSD file is missing. In the article, I am giving a link to download this video. So, just download the video and when you are in Photoshop, select the video layer and import the video to it again. This way, Photoshop will update the linkage with the video. hope this helps and let me know if you have further questions.
Hi RAFIQ ELMANSY.
I thank for your advice. I have downloaded video given in this tutorial. Later I uninstalled and reinstalled my photoshop cs6 extended version and tried it again……
Now the error is “Unable to validate your license please contact Technical Support”
help me out please
Thanks RAFIQ. But the I could not import..
I uninstalled my photoshop cs6 extended and installed it again. As you adviced I tried to do but this time the erro is “we colud not validate your license please contact your technical operator”
Oh, I am sorry to hear so. I believe that you need to install it again, it seems like the product cannot connect to Adobe server to validate it. Also, you may check the internet connection.
I already replied to your other comment about this issue.
I would be happy If you give a link of photoshop cs6 extended version of what you are using ……
I am sorry I do not got what do you mean? You can get the Photoshop from Adobe website if this what you mean.
Hi,
A question: can you fade in or out audio that comes with a clip? Meaning, I’m not adding a audio track, but using the audio with the video I imported – but can’t find a way to fade in and fade out the sound!
thank you,
margo
CS6 rocks in my humble opinion. I tried them last week and i must say i was blown away with new features. on that note i thank you for this wonderful tutorial.
Somewhat stormy
Any way to make audio transitions from one level to another?
No this is not available as the tool is still new and developing from version to another.
Its like you read my mind! You appear to know a lot about this, like
you wrote the book in it or something. I think that you could do with some pics to drive the message home a little bit, but instead
of that, this is wonderful blog. A fantastic read.
I will definitely be back.
I seriously love your blog.. Pleasant colors & theme.
Did you create this web site yourself? Please reply back as I’m looking to create my very own website and would like to find out where you got this from or exactly what the theme is named. Kudos!
[…] Creating Animation with Audio in Photoshop CS6 Tutorial […]
Nice tutorial, Thanks for share, Hope next one will get soon.
Hi there, all the time i used to check webpage posts here early in the
morning, as i enjoy to learn more and more.
[…] Creating Animation with Audio in Photoshop CS6 Tutorial […]
[…] Create animation with audio in Photoshop CS6 […]
Good