How To Create A Flash Login Screen Tutorial – Part 2
24
The last tutorial I showed how to to create a simple flash based login just using actionscript. A visitor has asked “how do I modify this to go to a web page instead of a different scene?” So this is the Flash tutorial of today, and the solution is very simple!
Related posts:
- Create Your First Android AIR App in Flash
- How to Create a Snake Game in Flash Using AS3
- Creating Reflection in Flash Using AS3
- Bitmap Data Manipulation in Flash ActionScript 3
- Creating and Controlling Flash Animation with XML
- How to Build a XML Driven Quiz Application in Flash
- Approach to Understand XML and Flash Workflow
I could of course use all the graphics on the last tutorial, but instead I am going to use a different set.
If you are not familiar with the URL Request from the flash.net package, please see the flash docs
open flash CS 4, create a new AS 3 file

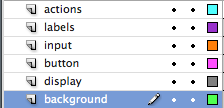
First lets create all our layers (notice the layers are bottom to top)
- background
- display
- input
- button
- labels
- actions
Your layers should look like this
background player – I changed the stage to 240 px X 125 px with a gray background (#CCCCCC). On the background layer, use take the rounded rectangle tool and create a background covering most of the stage. I am using black for the fill. The size is 220px for the width and 110 for the height, centered on the stage to leave some of the gray background as a boarder. Convert to a movieclip and call it background. lock the background layer.
display layer – Use the text tool and create a dynamic text field for the message (either error or success), give it an instance name of display_txt. I am just using Verdana text so you should this text on your machine. I am us a blue font color (#0099CC). yes I know it is for an error message as well, but nobody says it has to be red. I just like this color, but feel free to change it. Don’t forget to embed your font!
button layer – using the rounded rectangle tool create a box for the button. I used a size of 50 px X 16.7 and used a gray gradient fill. Use the text tool and in the center write “LOGIN”. convert to a movieclip and call it login_mc. This movie clip is your button, and give it an instance name of login_mc.
input layer – take a text input component (username field) and drag it to the stage, the dimensions will be Width-135 Height-16.4 and a X location- 86.05 and a Y location-40.05 give the input field an instance name of name_txt. Leave as single line in the behavior option. Take another text input component(pssword field) and drag it to the stage, the dimensions will be Width-135 Height-16.4 and a X location- 86.05 and a Y location-61.05 give the input field an instance name of pass_txt. Also be sure to pick the password type in the behavior option.
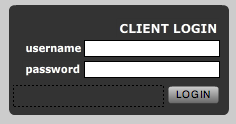
labels layer – Using the Text tool write a header for the application “Client Login” the dimensions will be Width-153.95 Height-19.0 and X location- 67.05 and Y location-18.8. Using the Text tool write “username” to the left of the username text input the dimensions will be Width-65.0 Height-16.0 and a X location- 20.05 and Y location-40.25. Using the Text tool write “password” to the left of the password text input the dimensions will be Width-73.0 Height-16.0 and X location- 10.05 and Y location-61.25.
The interface is now done and you should have
actions layer – (right click in the first frame and open actions panel)
first we will be adding a stop action so the movie does not continuous play, then setting up the event listener for the button.
so when the user clicks on the button a loginUser function is called.

Now in the loginUser we checked to see if the user entered the correct username/password combo, and if this is is true, a success message is displayed,
and the website is launched.
I am using:
usename -graphic
password -mania
On success the main page of graphic mania is launched.
I think that navigateToURL is clear, but ask any questions if not.
In general it is of the form:
navigateToURL( new URLRequest(“some web page”), “opening options”);

Check to see if the username/password was not entered correctly, and display a error message to the user.

that is it, if you have any questions about this Flash tutorial, please leave a comment or contact me. By the way if you are looking for a much more advance login tutorial I am working on one for my blog, which involves flash remoting & Coldfusion, there will be a link to this example later and will update the article with it.

you can download the source by clicking on the folder above!
Happy Flashing-
Johnny


[…] View post: How to Create Login in Flash Tutorial | Flash, Design, Vector … […]
[…] the original: How to Create Login in Flash Tutorial | Flash, Design, Vector … Share and […]
very nice tutorial, very useful, thank you I learned something new.
.-= logolitic´s last blog ..Eye manipulation tutorials in Photoshop =-.
[…] How to Create Login in Flash Tutorial | Flash, Design, Vector … […]
@logolitic Thanks!, and no worries I am glad that you liked it, and learn something new
-.-= johnnyb´s last blog ..Remoting Login & ColdFusion =-.
thank!
[…] the rest here: How to Create Login in Flash Tutorial | Flash, Design, Vector … Share and […]
@Alkallinuig you are very welcome I am glad you like it
-.-= johnnyb´s last blog ..Remoting Login & ColdFusion =-.
Excelent tutorial!! thank you very much!!! now I have a question… how can i use this example for more than one user??
@Emanuel Torres add more functions for each user. it would be better using a switch statement instead of if/else. I could do an example for you if you want.
.-= johnnyb´s last blog ..FDT Remoting Template =-.
is there a way to have multiple logins that point to specific directories with out using cold fusion. The sample log in work great but I have several users that need to access different directories. Each user log in would point to different directory…. HELP!!!! please.
You cannot use the behavior component in AS3?? Only in AS2 and prior – any ideas to get this to work???
Awesome stuff! Thanks for your effort in creating these posts!
Thanks 😉
thnx for ur tutorial.. i am workin on cs5.5 for develop android application.. i wnt o create user login page without password.. like normal game.. like new user jst entr their name and can entr in application.. and apps will store der name.. letr de can select name and can use apps frm previos state.. but i am having problem to create dis page.. can u help me to give some tips..how can i create in AS3 for android apps?\\ thnx.
Hi John i’m a Games design student in my 3rd year and haven’t really played about with Flash that much.
In my current project i’m making an educational game for young children and i followed your tutorial and found it very helpful.
What i wanted to know is…
A) Is there anyway to create an admin account for the teacher and myself to allow us to create other accounts/profiles for the children that will save their progress in the game.
B) Failing that is there a way to create accounts that get added to an offline database allowing the teachers or myself to create an account and password for each student.
Hi shan,
I am just getting starred in developing android apps myself. You should be able to transfer the code here using AIR for Android and it should work. This is basic structure of a login page, so you will be doing the same thing for AIR for Android.
Hi Rlewisrlou666,
A) just repeat the process for adding additional users,, you can even have the logged in page different for each user
B) the part in intergrading database functionallity you will need to use Flash Remoting, I plan to do a tutorial on this soon . It is that that hard, but you have to know a server side language like CodFusion, php, etc.
Hello Sir can u make a tutorial on how to create a login (with codes on how) that is to be integrated in flash.. for ex. the user will create an account then info will be saved on a database (the flash project will contain the data/info about the user ex. username and password) then when the user logged in using his/her username and password the contents will be shown. otherwise the user will enter correct username and password so that the contents will be shown..
thank u Sir.
..waiting for reply
Sure, we can put this in our publishing plan. Thanks for the suggestion
I’m also very curious about the suggestion of Miss Stowne. Is there already something available?
Thanks
Brent
Ur tutorial us awesome I just wanted to secure that page.
I mean I can go to that page directly as well as by login in as well.
How can I stop user to enter that page directly .
hey man its nice and cool but i want it not to go to url but to the next frame how to do that
Incredible points. Great arguments. Keep up the gooid spirit.